|


This tutorial is from Grafica PerGioco who I thank for
letting me translate their tutorials.

Original here

Tubes

Material

My images: Here
Plugins
Plugin AB 03 - Ulead Gifx2
You can find these plugins on the websites of:
Renée
Cloclo
You can also find this tutorial translated into these languages:
(Click on the flag)


|
Notes:
> Open the material / Duplicate (shift+d) / Close the originals
> Change the blend mode of the layers to match their colors.
> In older versions of PSP, Mirror Horizontal=Mirror / Mirror Vertical=Flip /
Pick tool=deformation
> Open the masks in psp and
minimize
>Adjust the size of the tubes according to your images
|
SCRIPT
Images:
1 misted image of a woman
1 brightly colored background
Step 1
Open a new transparent image with 900x600px
Selections / Select all
Copy the colored background and paste it into the selection
Select none
Effects / Plugins / Unlimited 2 / Plugins AB 03 / Weird Angles
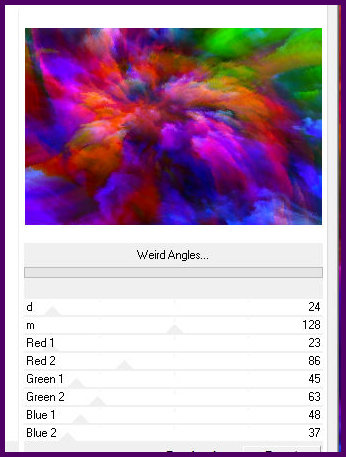
Effects / Edge Effects / Enhance more
Step 2
Layers / Duplicate
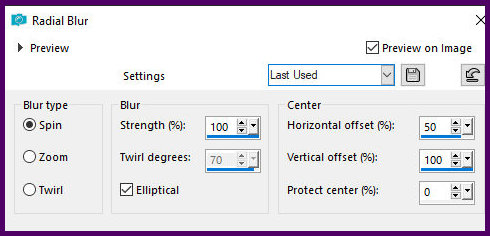
Adjust / Blur / Radial Blur
Change the layer opacity as desired
Merge down
Layers / Duplicate
Step 3
Effects / plugins / Unlimited 2 / plugins AB 03 / Waving Home
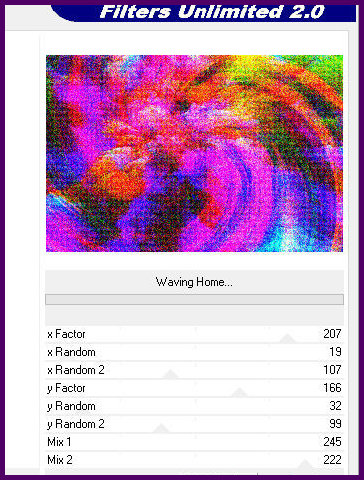
Blend Mode: Dissolve
Merge down
Step 4
Copy your misted tube image
Paste it as a new layer
Center it
Image / Add borders / 2px / white
Copy (it will be saved)
Image Step 4
Add borders / 5px / dark color
Selections / Select all
Image / add borders / 30px / white
Selections / invert
Step 5
Paste the image from memory into the selection
Adjust / Blur / Gaussian Blur: 35
Select none
Selections / Select all
Image / Add borders / 2px / white
Image / add borders / 5px / dark color
Selections / Select all
Selections / Modify / Contract: 10
Selections / invert
Effects / Plugins / Unlimited 2 / Plugins AB 03 / way out somewhere
>click on randomize and choose the setting that matches your work
Adjust / Blur / Gaussian Blur: 20
Effects / Plugins / Unlimited 2 / Plugins AB 03 / Waving home -
default
Drop shadow: 3 3 50 5.00 black
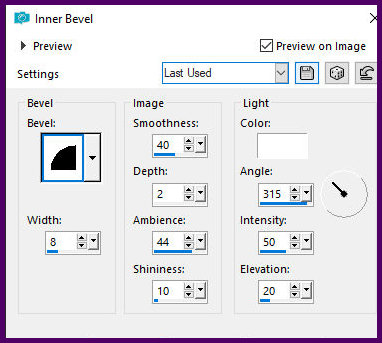
Effects / 3D Effects / Inner Bevel
Select none
Open your misted tube in the workspace
Open the round frame [BC-M&M-FALL ELEMS (64)]
Copy the frame
Paste it over the misted tube
Adjust the size of the misted tube to fit snugly inside the frame
Activate the frame layer
Select the center of the frame with the Magic Wand
Selections / Modify / Expand: 10
Selections / Invert
Activate the misted tube layer
Press Delete
Merge Visible
Copy and paste into your work
Position it according to the model or as desired
You can reduce it, duplicate it, and place as many as you want
If you don't want to add animation, add the signatures and save as a
jpeg
If you want to animate, save as a jpeg
IF YOU WANT TO ANIMATE THE FRAMES
Translator's Note:
I didn't animate it because I couldn't get the Ulead gifx2 Filter
plugin to work on My PSP X9 version, despite the author's
instructions. I apologize, therefore, for not being able to guide
you in running the animation.
You should have the Ulead gifx2 Filter plugin installed. This plugin
has several animations, but it's obsolete. It doesn't work on the
most recent versions of the PSP.
But we'll find a way.
If you have the PSP 9, you won't have any problems, as it works
perfectly in that version.
But if you have more advanced versions, you'll have to use a trick.
Close the PSP and reopen it as administrator, and the plugin will
magically work.
This filter has many options, and you can try them all until you
find one you like.
I used this one.
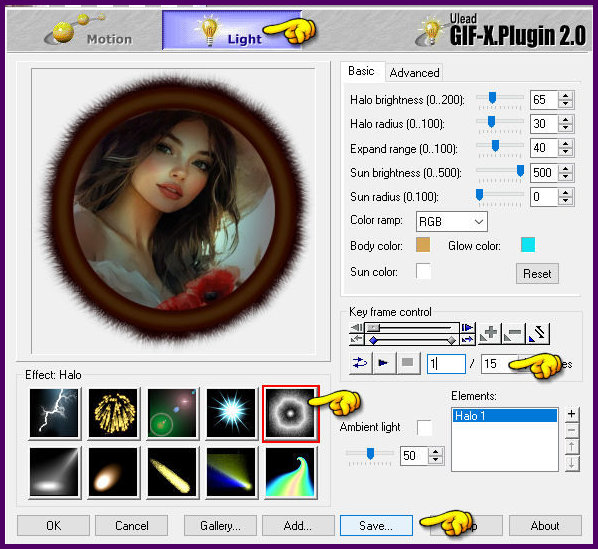
Click save and give it a name.
Open it again in AS; there are 15 frames.
Go back to the PSP, copy and paste the tag into AS.
We need 15 frames of the tag, as many as the number of frames it has.
You can duplicate it until you get 15 frames.
Or, to save time, go to Animation.
Insert a blank frame.
A window will open. Type 14 (because you already have one frame).
2 so that the duplicates are after the first frame.
At this point, you have 15 tags and fifteen round squares.
Select the entire tag.
Select all the squares and paste them into frame 1 of the tag. I
added two.
You can do whatever you want.
If you wish, you can invert the frames in the second square after
selecting it.

https://vmtubes.blogspot.com/2024/10/versoes-dos-tutoriais-de-amparito.html
https://vmtubes.blogspot.com/2024/10/versoes-tutoriais-magia-do-psp.html
https://vmtubes.blogspot.com/2024/10/versoes-dos-tutoriais-de-aracelli.html
https://vmtubes.blogspot.com/2024/10/versoes-dos-tutoriais-de-beasol.html
https://vmtubes.blogspot.com/2024/12/versoes-tutoriais-barbara-de-venise.html
https://vmtubes.blogspot.com/2024/11/versoes-tutoriais-creations-virginia.html
https://vmtubes.blogspot.com/2024/10/versoes-dos-tutoriais-de-christ.html
https://vmtubes.blogspot.com/2024/12/versoes-tutoriais-edda-tutorials.html
https://vmtubes.blogspot.com/2024/10/versoes-dos-tutoriais-de-esmakole.html
https://vmtubes.blogspot.com/2024/10/versoes-dos-tutoriais-de-estela-fonseca.html
https://vmtubes.blogspot.com/2024/10/versoes-dos-tutoriais-da-grafica-per.html
https://vmtubes.blogspot.com/2024/10/versoes-tutoriais-jytte.html
https://vmtubes.blogspot.com/2025/09/versoes-tutoriais-kniri.html
https://vmtubes.blogspot.com/2024/11/versoes-tutoriais-lady-valella.html
https://vmtubes.blogspot.com/2024/10/versoes-dos-tutoriais-de-loivarice.html
https://vmtubes.blogspot.com/2024/11/versoes-tutoriais-mabel.html
https://vmtubes.blogspot.com/2024/10/versoes-tutoriais-mamiely.html
https://vmtubes.blogspot.com/2024/10/versoes-tutoriais-manyi.html
https://vmtubes.blogspot.com/2024/12/versoes-tutoriais-melodi.html
https://vmtubes.blogspot.com/2024/10/versoes-tutoriais-psp-met-plezier.html
https://vmtubes.blogspot.com/2024/11/versoes-tutoriais-de-romana.html
https://vmtubes.blogspot.com/2024/11/versoes-tutoriais-stardesignpsp.html
https://vmtubes.blogspot.com/2024/11/versoes-tutoriais-tshaka.html
https://vmtubes.blogspot.com/2024/12/versoes-tutoriais-yedralina.html
|