|


This tutorial is from stardesignpsp who I thank for
letting me translate their tutorials.

Original here

Tubes

Tubes: Stella
Material

Plugins
VanDerLee
You can find these plugins on the websites of:
Renée
Cloclo
You can also find this tutorial translated into these languages:
(Click on the flag)


|
Notes:
> Open the material / Duplicate (shift+d) / Close the originals
> Change the blend mode of the layers to match their colors.
> In older versions of PSP, Mirror Horizontal=Mirror / Mirror Vertical=Flip /
Pick tool=deformation
> Open the masks in psp and
minimize
>Adjust the size of the tubes according to your images
|
SCRIPT
You will need:
1 main tube
2 landscapes
*
Save the selection in the PSP
Selections folder
Open the [goldtile] pattern in PSP (or use another pattern)
*
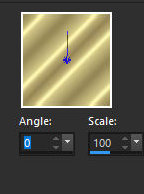
1
Open a new transparent image with 900x600px
In the color palette (foreground) select the Pattern option
Choose the Goldtile pattern and configure as shown in the screenshot
Translator's note: The goldtile pattern was crashing my PSP, I
couldn't use it, I used another pattern
Paint the image with this pattern
2. Add a new layer
Selections / Select all
Copy the image [a4c017992db9b69eb808b814d6ed071f]]
Paste it into the selection
Select none
Layers / Properties / Blend Mode: Hard Light
3
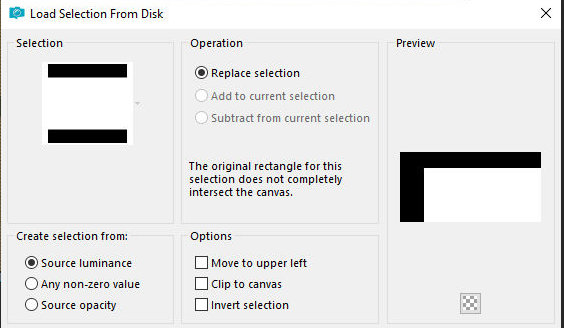
Add a new layer
Selections / Load selection from disk / Selection
[sel_2.12.25_navidad_stella]
Copy the image [paisaje_nevado]
Paste it into the selection
Select none
Layer s/ Properties / Blend Mode: Multiply
4
Add a new layer
Selections / Select all
Paint with white color
Layers / New Mask layer / From Image / Mask [Joyce2] - INVERT
CHECKED
Merge Group
Rename this layer as Joyce
5
Copy the image [brillos_1.12.2025]
Paste it as a new layer
Layers / Properties / Blend Mode: Multiply
6
Copy the tube [niña_nieve]
Paste it as a new layer
Image / Mirror / Mirror Horizontal
Position according to the model
Adjust / Sharpness / Sharpen
Drop Shadow: 0 0 80 30 black
7
Add a new layer
Selections / Select all
Copy the [Image of a baby mask]
Paste into selection
Layers / Properties / Blend Mode: Screen
Select none
8
Copy the image [silvie_mask_christmasstar_54_] (do not copy the mask,
the image is in the material)
Paste as a new layer
Image / Resize: 50% - all layers unchecked
Position on the girl's hands as per the model
Layers / Properties / Blend Mode: Dodge
(if necessary, depending on the background you can change the blend
mode and duplicate the image)
[Example:
Layers / Duplicate
Layers / Properties / Blend mode: Hard Light]
Drop Shadow: 0 0 80 30 black
Layers / Properties / Opacity: 80%
If part of the image overlaps the tube character, erase it using the
Erase Tool
Adjust / Sharpness / Sharpen (optional)
9
Copy the image [marco_dorado_2025]
Paste as a new layer
Layers / Properties / Blend mode: Overlay
10
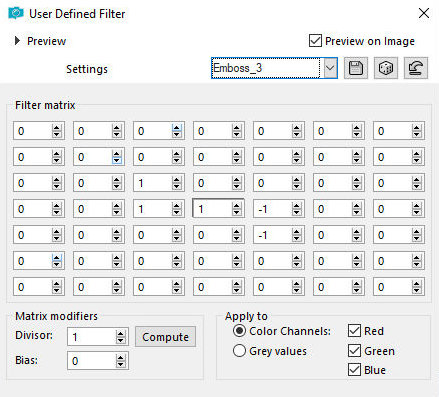
Copy the image [abstract888]
Paste as a new layer
Image / Resize: 80% - all layers unchecked
Activate the Pick tool and configure; X=-17 - Y=-263 - Press M
Erase the part that overlapped the
girl's face with the Eraser Tool
Effects - User Defined Filter / Emboss 3
Layers / Arrange / Move down
It will be below the image [marco-dorado]
11
Activate the girl's layer
Add a new layer
Effects / Plugins / VanDerLee / Snowflakes
12
Activate the tube layer [joyce2]
Layers / Properties / Blend Mode: Dodge
Copy the image [cuadros_dorados]
Paste as a new layer
Layers / Properties / Blend Mode: Multiply
Activate the tube layer [joyce]
Layers / Properties / Opacity: 80%
13
Activate the top layer.
Copy the text [texto_magic] (the
material has two texts: the original and the one that was given a
gold texture, use whichever you prefer).
Paste as a new layer.
Position as desired.
Drop shadow: 1 -1 80 2 white
Drop Shadow: 0 0 40 30 black
14
Add the signatures.
Merge all.
Save as jpeg.

|