|

This tutorial is from STARDESIGNPSP who I thank for
letting me translate their tutorials.

Original here

Tubes

Material

Plugins
Unlimited - Mura's Meister - Simple
- Eye Candy 5: Impact
You can find these plugins on the websites of:
Renée
Cloclo
You can also find this tutorial translated into these languages:
(Click on the flag)


|
Notes:
> Open the material / Duplicate (shift+d) / Close the originals
> Change the blend mode of the layers to match their colors.
> In older versions of PSP, Mirror Horizontal=Mirror / Mirror Vertical=Flip /
Pick tool=deformation
> Open the masks in psp and
minimize
>Adjust the size of the tubes according to your images
|
SCRIPT
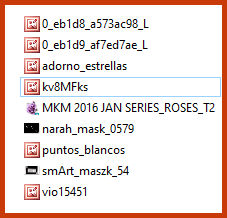
Images:
1 female tube
*
My images
*
Material
*
1.
Open a new transparent image with
900x700px
Selections / Select all
Copy the image [MKM 2016 JAN SERIES_ROSES_T2]
Paste it into the selection
Select none
2.
Layers / Duplicate
Activate the layer below (original)
Adjust / blur / Gaussian Blur: 50
Effects / Plugins / Simple / Diamonds
Merge all
3.
Layers / Duplicate
Layers / New Mask Layer / From Image / Mask [smArt_maszk_54] -
INVERT SELECTED MASK
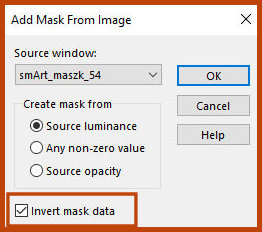
The mask will not appear at this stage, this is normal
Effects / Edge Effects / Enhance More
Merge group
Drop shadow: 0 0 50 30 black
Effects / User Defined Filter / Emboss 3
Drop Shadow: 1 -1 80 1 black
4.
Activate the background layer
Layers / Duplicate
Layes / Arrange / Bring to top
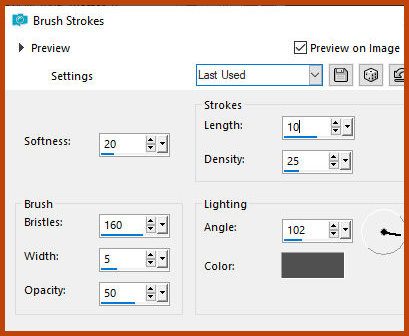
Effects / Art Media Effects / Brush Strokes - color #505050
Blend Mode: Soft Light
Effects / User Defined Filter / Emboss 3
5.
Copy the image [MKM 2016 JAN
SERIES_ROSES_T2]
Paste as a new layer
Image / Mirror / Mirror Horizontal
Image / Resize: 25% - all layers unchecked
Position in the lower left corner as shown in the model
(Note: Depending on the positioning of this image, you will have a
different result in the next step.
If using your own image, test the positioning several times until
you are satisfied with the result.
If using the material image:
Activate the Pick Tool and configure: Scale(X)=536 - Scale(Y)=100 -
Press M

6.
Effects / Plugins / Mura's Meister
/ Copies - Preset [Line]

Adjust / Blur / Gaussian Blur: 50
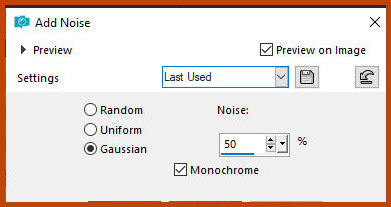
Adjust / Add/Remove / Add noise
7.
Affects / Plugins / Eye Candy 5: Impact / Gradient Glow - Preset [Black
and White Stripes] - default
If necessary, move as close as possible to the bottom edge.
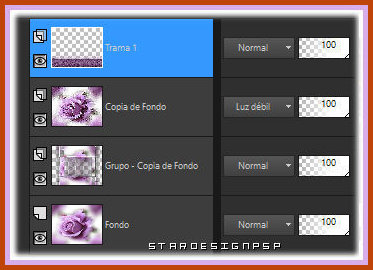
8.
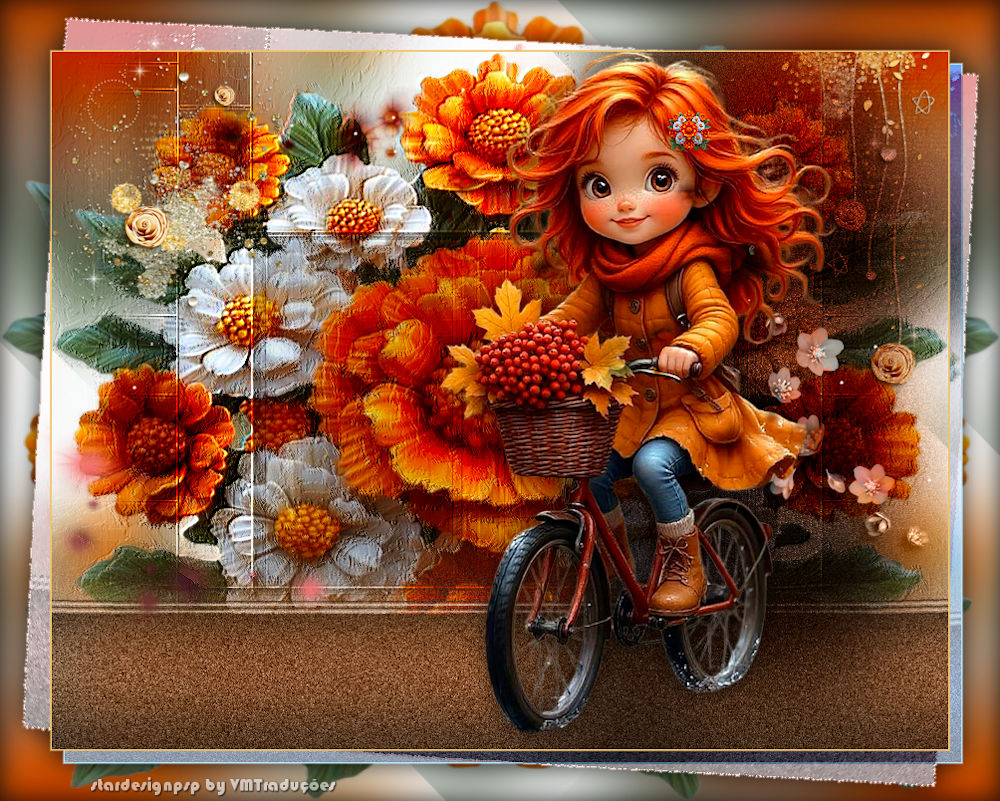
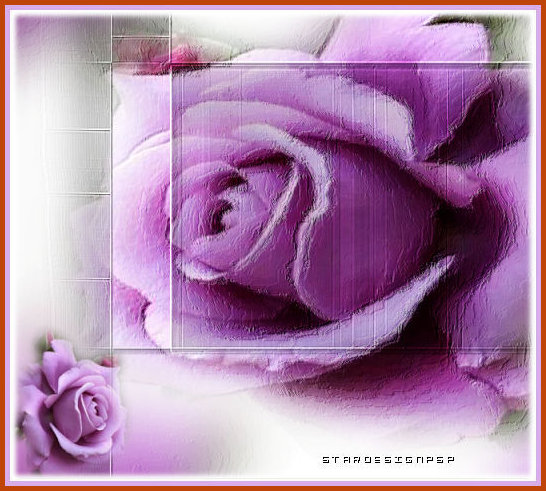
The layers will look like this:
9.
Copy the image [0_eb1d8_a573ac98_L
(ornament)]
Paste as a new layer.
Position in the upper left corner
as shown in the model.
10.
Copy the image [0_eb1d9_af7ed7ae_L
(ornament)]
Paste as a new layer.
Position at the top right as shown
in the model.
11.
Copy the image [vio15451 (character)]
Paste as a new layer.
Image / Resize: 85% - all layers
Unchecked
Position to the right as per the model
12.
Layers / Duplicate
Activate the layer below (original)
Adjust / blur / Gaussian Blur: 50
Adjust / Add / Remove Noise / Add Noise - same as before
Move slightly to the right as per the model
Blend Mode: Multiply
Layers / duplicate
Activate the top layer and apply a Drop Shadow of your choice
13.
Copy [kv8MFks image (lilac flowers)]
Paste as a new layer
Image / Resize: 50% - all layers unchecked
Position as per the model
Blend mode: multiply (or another according to your colors)
14.
Activate the top layer (of the
girl)
Copy the image [MKM 2016 JAN SERIES_ROSES_T2]
Paste as a new layer
Image / Resize: 7% - all layers unchecked
Image / Mirror / Mirror Horizontal
Position over the Girl's hair (observe the model)
Adjust / Sharpness / Sharpen
(Note: This step is optional, it will depend on the image chosen)
15.
Activate the background layer
Copy and paste as a new image Layers / New Mask layer / From Image /
Mask [narah_mask_0579] Merge group
16.
Copy (will be in memory)
Activate the top layer of the main image
Paste as a new layer Image / Mirror / Mirror Horizontal
Image / Mirror / Mirror Vertical
Activate the Pick Tool and configure: X=-71 Y=-266 Press M
Blend Mode: Multiply
17.
Copy [puntos_blancos]
Paste as a new layer
Activate the Pick tool and configure: X=18 Y=36 Press M
18.
The layers will look like this:
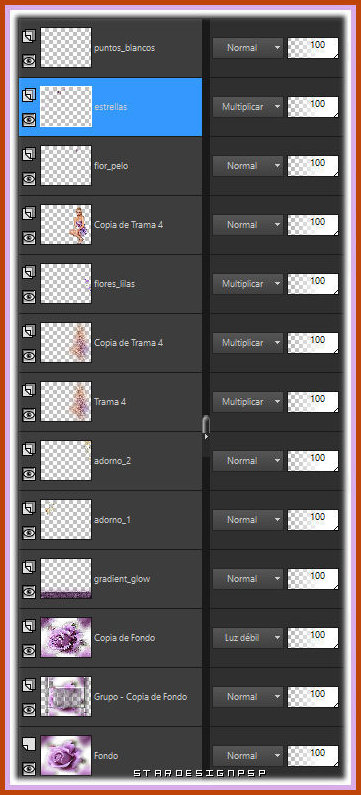
19.
Copy [adorno_estrellas]
Paste as a new layer
Activate the pick tool and configure: X=-21 Y=369 Press M
20.
Activate the background layer
Copy and paste as a new image
Minimize for now
21.
Activate the main image
Image / Add borders / 2px /
background color (#66043b)
Image / Add borders / 50px / white
Select this 50px border with the Magic Wand (tolerance/feather=0)
Effects / Plugins / unlimited 2 / Sapphire Filters 02 / Sapphire
Plugins-0197

Select none
22.
Select the white areas with the Magic Wand
Maximize the previously reserved image
Copy and paste into the selection
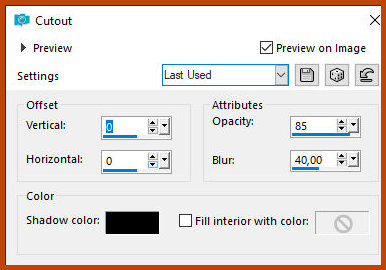
Add a new layer
Effects / 3D Effects / Cutout
23.
Select none
Add the credits
Merge all
Save as jpeg

|