| Você precisará de 1 tube
feminino
*
Abra o arquivo alpha channel [Beácska PSP IMAGE fáj] /
duplique (shift+d) / Feche o original
Layers / Duplicate
Cores Originais:
Pinte a layer superior com a cor
branca e a layer inferior com a cor #6e324b
Layers superior ativada
Layers / New Mask layer / From Image / Mask
[TLkLM4NAE6jONIFT7_Vl8REmLMo]

Merge Group
Layer superior ativada
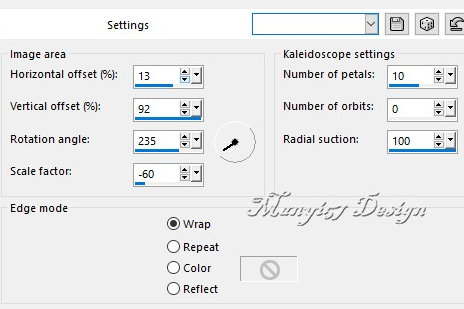
Effects / Reflection Effects / kaleidoscope
[ 13 92 235 -60 10 0 100 wrap ]
Effects / user Defined Filters / Emboss 3

Effects / Plugins / GMIC-QT / Testing
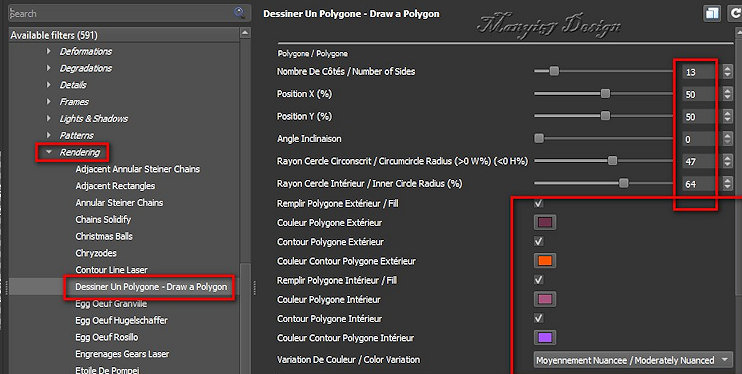
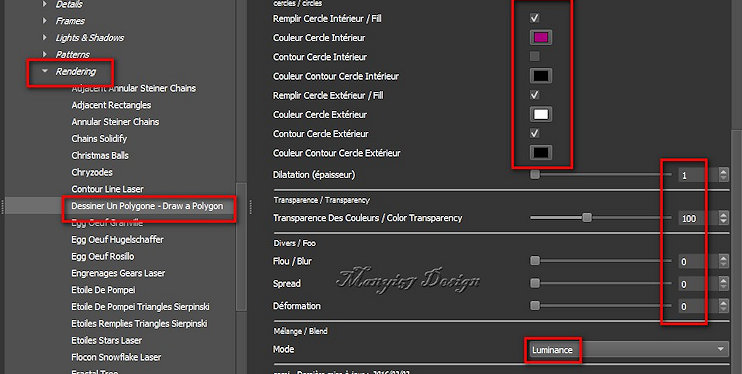
/ Samj/ Rendering-Dessener Un Polygone - Draw a Polygon
Cores: #6e324b - #ff5600 - #ae537f - #a257fc
Colorize com uma cor que combine com
suas cores
Effects / Reflection effects / Rotating Mirror

Selections / Load selections from
alpha channel / Selection 1

Adicione nova layer
Effects / Plugins / Eye Candy5: Impact / Glass

Select none
borda: 60px / #ffffff
Adicione nova layer
Effects / Plugins / GMIC_QT / Testing / Samj / Frames /
At06B 2017 Frame Painting

Layers / Duplicate
Layer duplicada ativada
Edit/Cut (ficará uma cópia na memória)
Selections / Select all
Selections / Modify / Contract

Cole na seleção a imagem que está na
memória
Select none
Layers / Arrange / Move Down
Copie o tube feminino
Cole como nova layer
Ajuste o tamanho para 427x595px
Posicione onde preferir ou:
Ative a pick Tool e configure: X=10 - Y= 16

Adjust / Sharpness / Sharpen
Drop Shadow: 0 0 60 30 cor #371926 ou de acordo com sua
imagem
Merge visible
Image / Resize: 950x601px (opcional)
Coloque as assinaturas
Merge all
Salve como jpeg
|